


Introduction
A Software Defined Perimeter (SDP) offers a compelling alternative to traditional VPNs, allowing you to deploy and secure remote access for all users, scale rapidly and economically, and reduce the potential risk of attacks.
In Gartner’s words, "Enterprise access requirements are growing ever more complex due to application dynamics, cloud adoption and mergers. To cut through this complexity, technical professionals should explore Software Defined Perimeters (SDP) — a new technology whose strength lies in facilitating access to enterprise apps."
In other words, it’s time to upgrade from legacy VPN to SDP. But how is this actually done from a practical perspective?
This paper outlines five steps for implementing an SDP solution.
Why SDP and not VPN?
Traditional VPNs were invented more than 20 years ago, at a time when all enterprise apps were hosted in local data centers and most employees were working on-premise.
But it’s a different world today. The network perimeter that VPNs were designed to protect has essentially dissolved, and a typical enterprise has dozens, and often hundreds, of applications hosted on public clouds like Amazon AWS.
VPNs have several shortcomings that make them ill-suited for today’s needs, and ripe for replacement.
Zero-trust. VPNs provide broad access to the enterprise network. Once a remote user is authenticated, he/she is considered trusted. Consequently, VPN access is overly permissive, granting remote workers access to more of the network than is required to complete their tasks. In this setup, network resources are unnecessarily visible, overly vulnerable, and open to attack.
An SDP, on the other hand, takes an identity-based, zero-trust approach that enforces a custom policy for each user device. Each connection is treated as untrusted and is, therefore, verified continuously.
DDoS attacks. Traditional VPN gateways can be discovered with reconnaissance methods and fall victim to distributed DoS (DDoS) attacks. A cloud-based SDP solution essentially cripples reconnaissance attacks.
User experience. When you have to backhaul traffic to a centralized data center for VPN termination or for security purposes, there is latency which degrades the application’s performance. In addition, users often face unreliable client applications and complex configurations.
Concurrent access to multiple apps and clouds. VPNs were never designed for hybrid clouds or distributed cloud computing. It’s not uncommon for a sales person working remotely to require access to a manufacturing system in the data center, a supply chain app hosted on AWS, and a CRM system hosted on Azure. From an end user’s perspective, this translates either to an annoying stream of connecting to and disconnecting from different resources, or to the latency associated with backhauling through a VPN concentrator.
In contrast, SDP architecture inherently supports multi-app, multi-cloud connectivity, enabling clients to establish and maintain concurrent access between many applications and services.
Management. VPN management balloons in complexity as more enterprise applications move to the cloud. SDP offers a dramatically simpler administration of any number of data centers and cloud deployments, with a single pane of glass for defining policy and tracking events. With SDP, you onboard each network resource once and manage all policies centrally, avoiding the need to configure and sync across different locations.
Five Steps for SDP Implementation
Setting up an SDP to replace an existing remote access VPN involves five key steps. The process begins with analyzing the access requirements of your organization (steps 1-2). It then proceeds with implementing these policies within the SDP admin console and onboarding users and resources (steps 3-5).

1 - Designate Target Applications
If up until now, while using VPNs, your practice was to provide network access to a VLAN or to a range of IPs, with SDP your goal is to provide fine-grained access based on user needs. The first step, therefore, is to create a list of the specific enterprise applications and services which you want to make selectively available to each use group.
Begin by identifying the list of applications to expose using a fully qualified domain name (FQDN), a local domain name, or IP address and port.
For example, if up to this point you have opened IP 192.168.0.0/16 for remote users, you would now split the subnet into three separate entities, where you would specify for each:
- Service name - an easily identifiable application/service name • IP or FQDN • Port
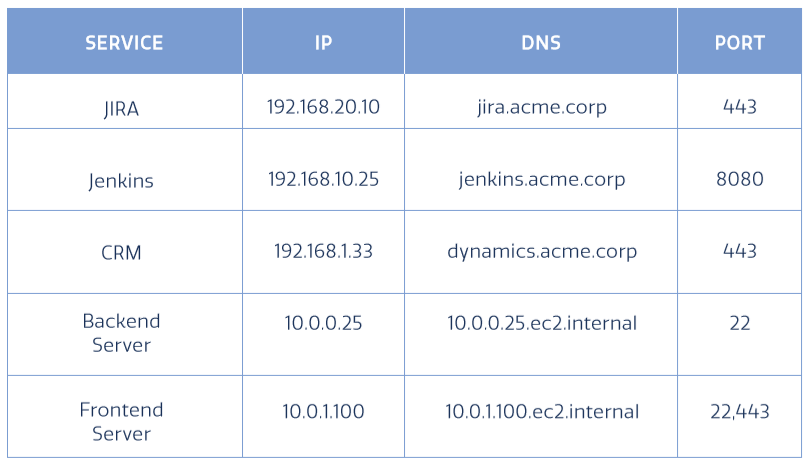
By the end of this stage, you should have a complete, detailed list of all enterprise services/applications (on-cloud and on-premise), which require access by employees, contractors, partner and customers.
2 - Onboard Users and Define Access Needs
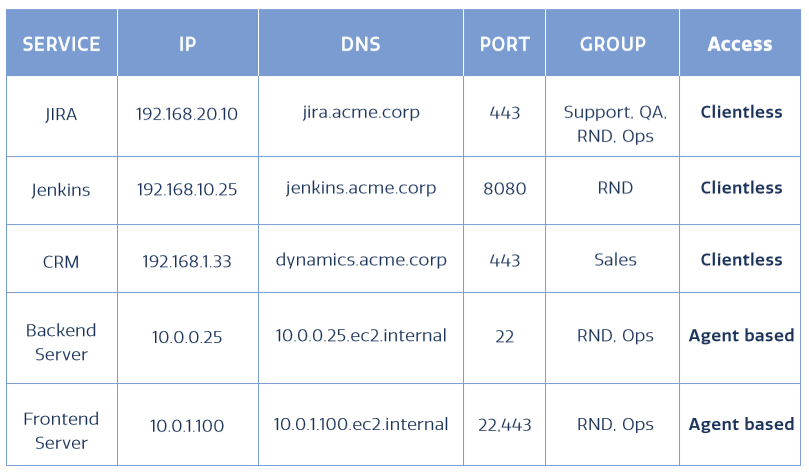
The second step to switch from VPN to SDP requires you to define the users that will access each of the applications/resources, including the required connectivity and authentication methods. You should classify users into groups based on the access requirements - e.g., R&D and QA can access Jira, but cannot access the Sales/Marketing file server.
Groups. Define different user groups according to their roles or the access that they require.
Users. Define the list of individual users within each group. This can be done by extracting data from existing systems like Active Directory, Azure ID, Okta, OneLogin, or any other identity provider. If the IdP supports SCIM, you will also benefit from automatic synchronization.

Access type. Determine the required access type for each of the services and applications.
- Agent-based access: Allows users seamless access (as if they were in the office) to any application or network resources allowed by their policy.
- Full tunneling routes all traffic - both enterprise and internet - through a secure IPsec tunnel. This approach ensures that the device is secured at all times and is most often used for employees with managed devices that need access to a variety of sensitive resources.
- Split tunneling (ST) separates enterprise traffic from internet traffic. It uses an IPSec tunnel to provide access to enterprise resources, but other traffic (such as over a local network to the printer, or out to the internet), is not secured. This approach offers a different standard of internet privacy and is often applied to non-employees.
- Clientless, or no client (NC) allows users to access the resource via the browser, without any client installed. This could be used, for instance, for external contractors. Clientless connectivity is limited to applications that run inside a browser such as web, RDP and SSH.
Authentication method. Define the authentication methods you would like to enforce for user devices (i.e. a user name/password, two-factor authentication (2FA), or single sign-on (SSO) using an IdP). You can also apply posture checks to make sure a device is compliant with an enterprise policy, such as running a pre-defined AV, or joined to an AD Domain.
3 - Configure SDP Connectors
Lightweight connectors, typically provided by the SDP solution, enable a secure authenticated interface between existing servers and the SDP cloud. Once configured, connectors enable users to access your applications via the SDP.
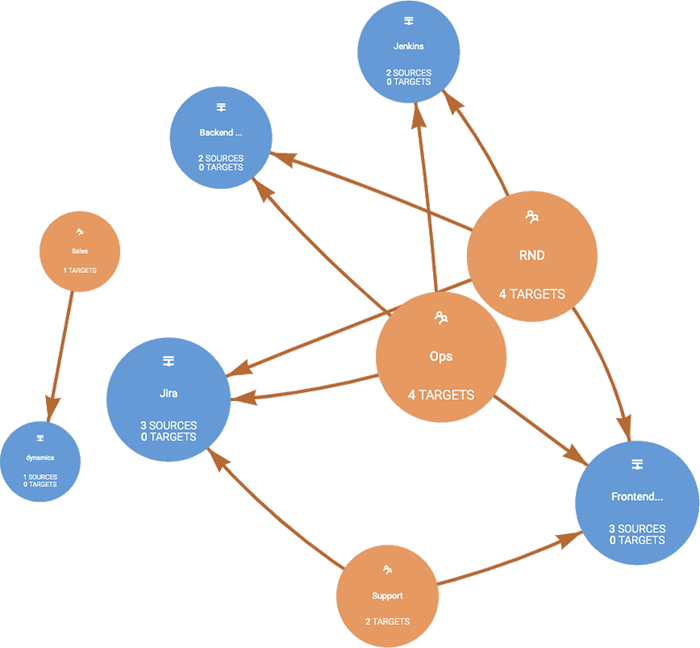
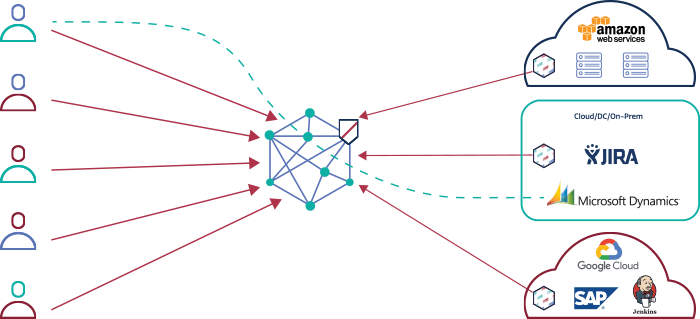 Lightweight SDP connectors provide a secure interface between your existing servers and the SDP cloud and facilitate microsegmented user access to applications. For example, the above architecture shows the Meta Networks cloud with 3 SDP connectors for AWS, Jira and Jenkins.
An important issue with SDP connectors is that they don’t require any changes to your existing topology, such as changes to your local DMZ or AWS security groups.
Using a connector reduces the attack surface by hiding the services from the Internet, thereby preventing DDoS and other attacks. As a backup, you may leave your existing access methods in place.
For example, SDP connectors may be delivered as a virtual machine (VM) image for deployment in enterprise data centers, local private cloud environments such as VMware, or public cloud environments such as AWS EC2.
4 - Set SDP Policies
During this stage, implement the access policies you planned in the previous steps using the SDP admin console.
Below, we see an example of the Meta Networks admin console, where administrators define access policies using groups and user identity rather than IPv4 MAC addresses. All-access is whitelisted, requiring that a policy is explicitly defined for an enterprise resource, including the specific protocol.
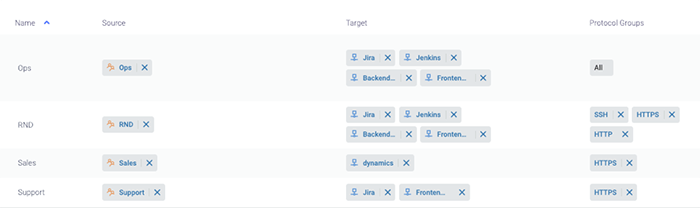
 The Meta Networks console enables setting up identity-based, custom policies for groups and users, which define access to specific applications and services. Admins can also view a visual map showing the access policies for any user or group.
5 - Define Alerts and Audit Procedures
Finally, as a CISO, CIO, or other IT/security manager, you want to be able to easily track and audit remote user activities. An SDP provides a single pane of glass for tracking access and network activity across systems.
Built-in access logs and alerts let you monitor data including network traffic and activities taken within the SDP system, or various security events like password resets and missing certificates. You can examine and filter any type of event, as well as define alert notifications to be sent to email, webhooks (integrating with SaaS apps), PagerDuty or Slack. For instance, you may define an alert to be sent when a specific user accesses a sensitive system via VPN. Optionally, you may also configure a continuous export of logs from your SDP system to a third party SIEM.
 The Meta Networks SDP offers various monitoring and auditing capabilities, like the ability to view all users and devices connected to enterprise resources, their geographic locations and connectivity method.[/caption]
Learn more
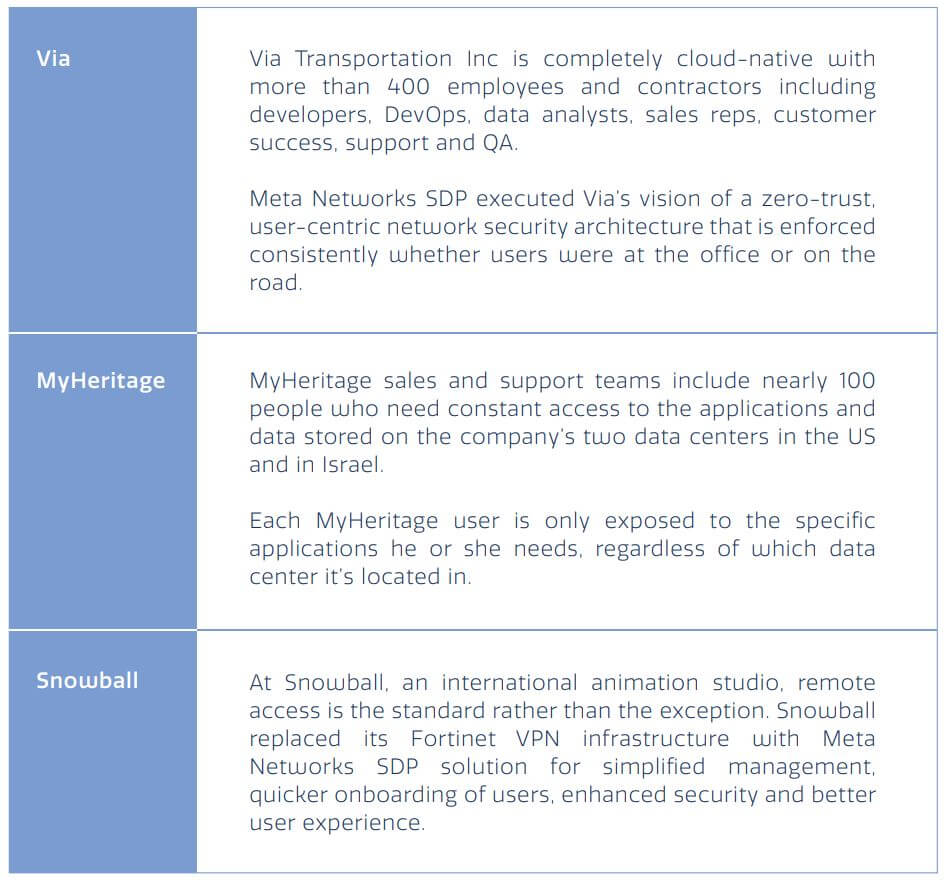
To learn more about the implementation of SDP and its benefits over VPN, check out some of the case studies below.
To view how the steps described in this paper can be efficiently be deployed using the Meta Networks SDP, sign up for our demo.
Subscribe to the Proofpoint Blog